

This guide walks you through publishing your own Android app on Google Play, step by step.
You create your Google Play developer account and your app, then invite us. We build the app, fill in most of Google's forms and publish it under your company's name. Some steps are yours, some are ours: each one says who does it.
You can follow the same guide, with your own app's details filled in, in your Mobile apps panel, under Android.
Before you start
A Google account for your company. Use one Google account just for this. You sign in to Play Console with it, or with another account that is an admin there.
Google's fee: US$25, once. You pay it to Google when you create your developer account. Google does not give it back if it turns your company down, so read this list first.
Organization or Personal account. Pick Organization if you have a registered company: your company's name shows in the store. An Organization account needs a D-U-N-S number for your company. It is free, and it can take up to 30 working days to get one. A Personal account is for one person.
Google checks who you are. Google asks for an ID, company documents, a phone number and an email address. It does not say how long the check takes, so allow a few days.
Personal accounts made after 13 November 2023. Google asks these accounts to test the app with at least 12 people for 14 days in a row before it can go public. Organization accounts skip this.
How long it takes you. About an hour for Google's sign-up forms, then about 20 minutes in Play Console to create the app and invite us. We do the rest.
Step 1. Create your Google Play developer account
Who: You. Time: About an hour of forms, then a few days while Google checks your details.
Your app is published under your company's own account, so your name shows in the store, not ours.
Sign up
- Open the sign-up page and sign in with your company's Google account.
- Choose Organization if you have a registered company, or Personal if you don't.
- Fill in the forms and pay Google's US$25 fee.
- Answer the trader question for your company. It is your company's own answer, so only you can give it.
Wait for Google
- Google checks your identity and your company. It emails you when it is done.
- Then come back here and tell us which kind of account you have.
Tips:
- Already have a developer account? Skip the sign-up and just answer the questions below.
- Personal account made after 13 November 2023? Google adds a 14-day test with 12 people before your app can go public. We show you those steps when they apply.
Google's help:
- Create your developer account
- Get started with Play Console
- Choose a developer account type
- Verify your developer identity
How you know it's done: You tell us here once Google has approved your account.
Step 2. Write your store listing
Who: You. Time: About 10 minutes.
This is what people read about your app on Google Play.
In this panel
- App name: the name people see in the store, 30 characters at most. Use the name your customers know you by.
- Short description: one sentence, 80 characters at most.
- Full description: what your app does and who it is for.
- Contact email: where people who use your app can write to you.
- Click Save the listing.
Tips:
- Write in your app's main language. Use the language code Play Console uses, such as en-US or es-ES.
How you know it's done: Marked done as soon as the listing is saved and complete.
Step 3. Upload your app icon
Who: You. Time: 2 minutes.
Your icon shows in the store and on people's phones.
In this panel
- Choose a square PNG image of 1024 × 1024 pixels, with no see-through parts.
- Click Upload the icon.
Tips:
- Keep it simple: a logo on a plain background reads best at small sizes.
How you know it's done: Marked done as soon as the icon is uploaded.
Step 4. Create your upload key
Who: You. Time: 1 minute.
Google only accepts new versions of your app signed with this key. It proves they come from you.
In this panel
- Click Create the upload key. We make it once, on our build computer.
- Click Download the key and keep the file and its passwords somewhere safe, such as your password manager.
Tips:
- You need to have signed in recently. If we ask you to, sign in again and come back.
How you know it's done: Marked done as soon as the key exists.
Step 5. Create your app in Play Console
Who: You. Time: About 5 minutes.
Your app needs a place in your Play Console before anything can be uploaded to it.
What you need to copy:
- App name: your app name, such as
Acme Chat - Package name: shown in your Mobile apps panel, such as
com.acmechat.app
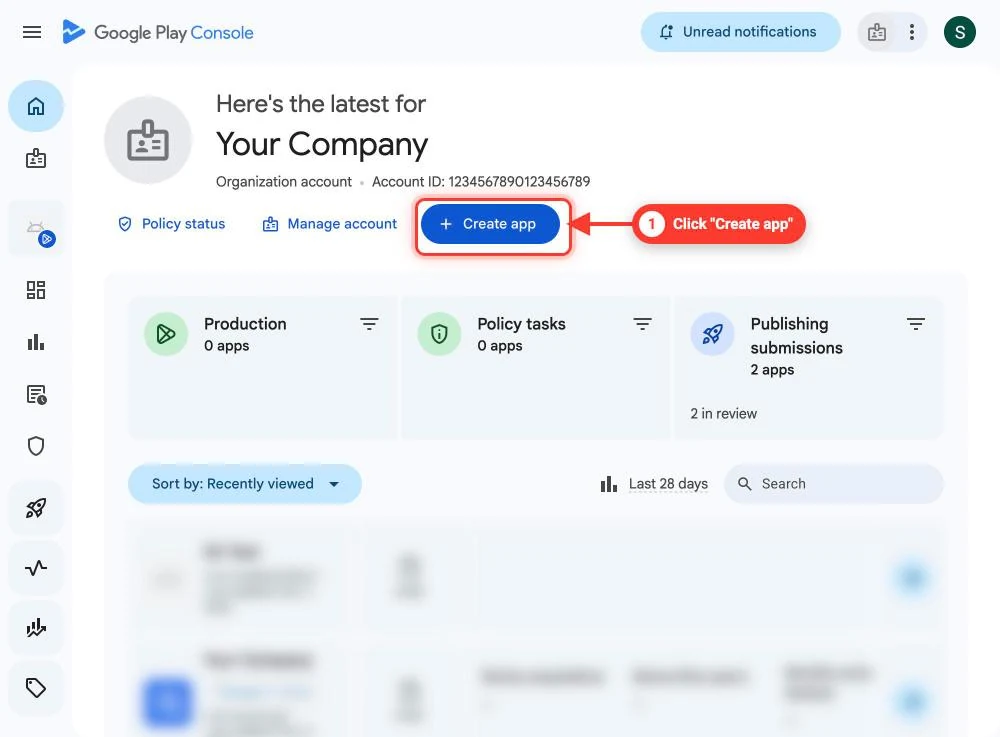
Click "Create app"
- Go to Play Console and sign in.
- On the home page, click Create app.
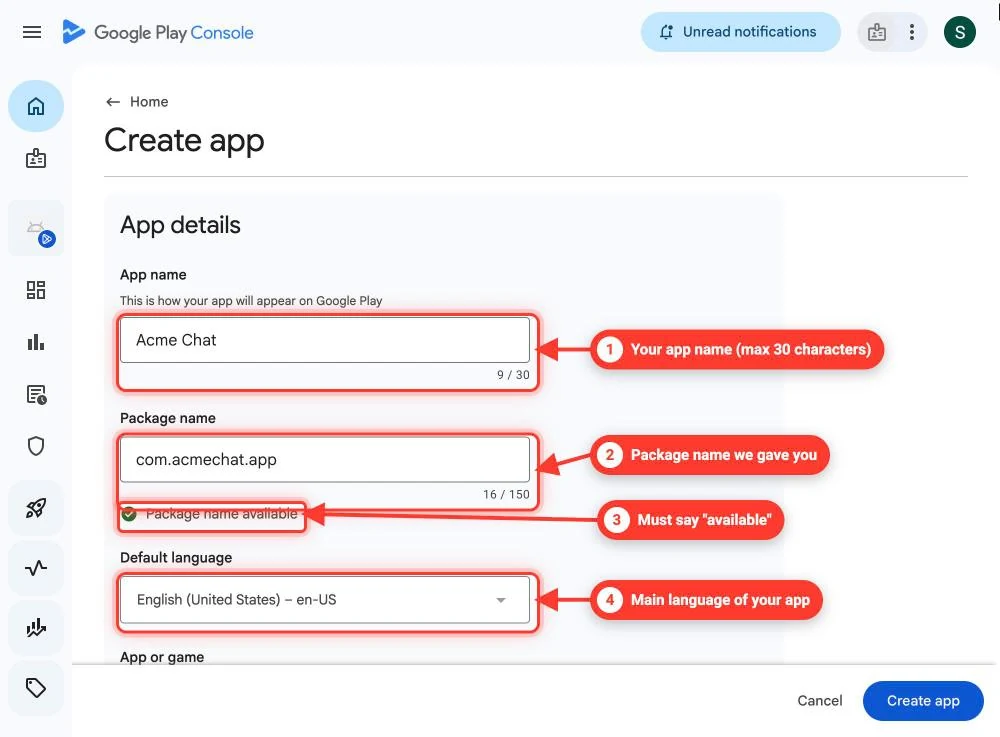
Type your app name and package name
- App name: type your app name (such as Acme Chat).
- Package name: paste your package name (such as
com.acmechat.app). Copy it exactly: it can never be changed once the app is created. - Google checks it straight away. It must say Package name available, with a green tick.
- Default language: choose your app's main language.
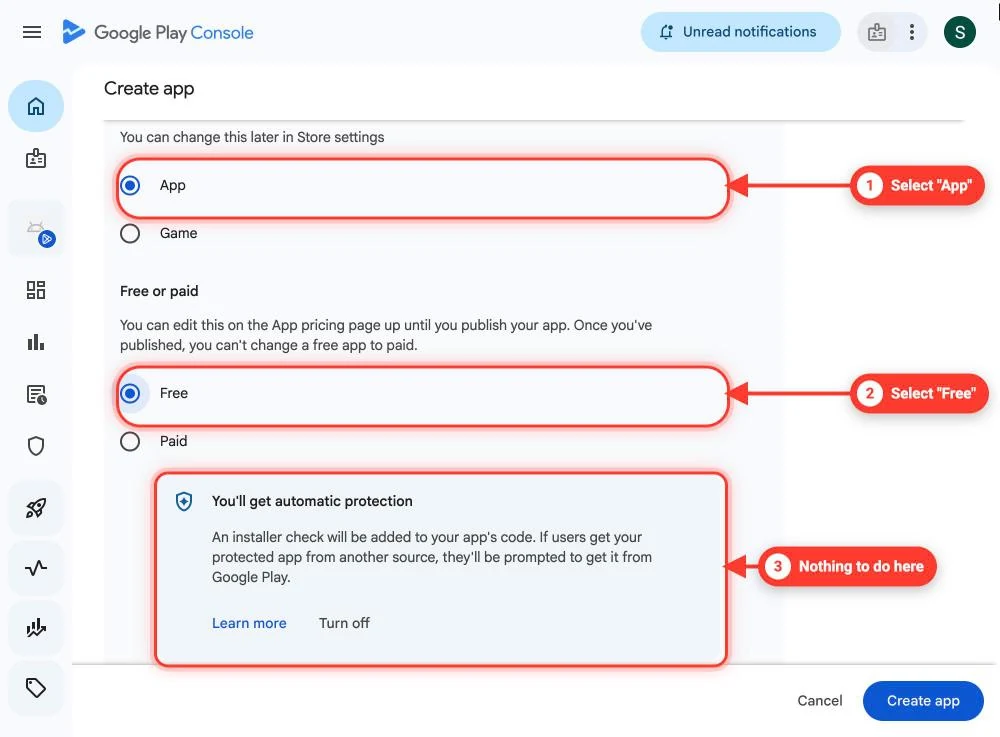
Choose "App" and "Free"
- Under App or game, select App.
- Under Free or paid, select Free.
- A box called You'll get automatic protection appears. You don't need to do anything with it.
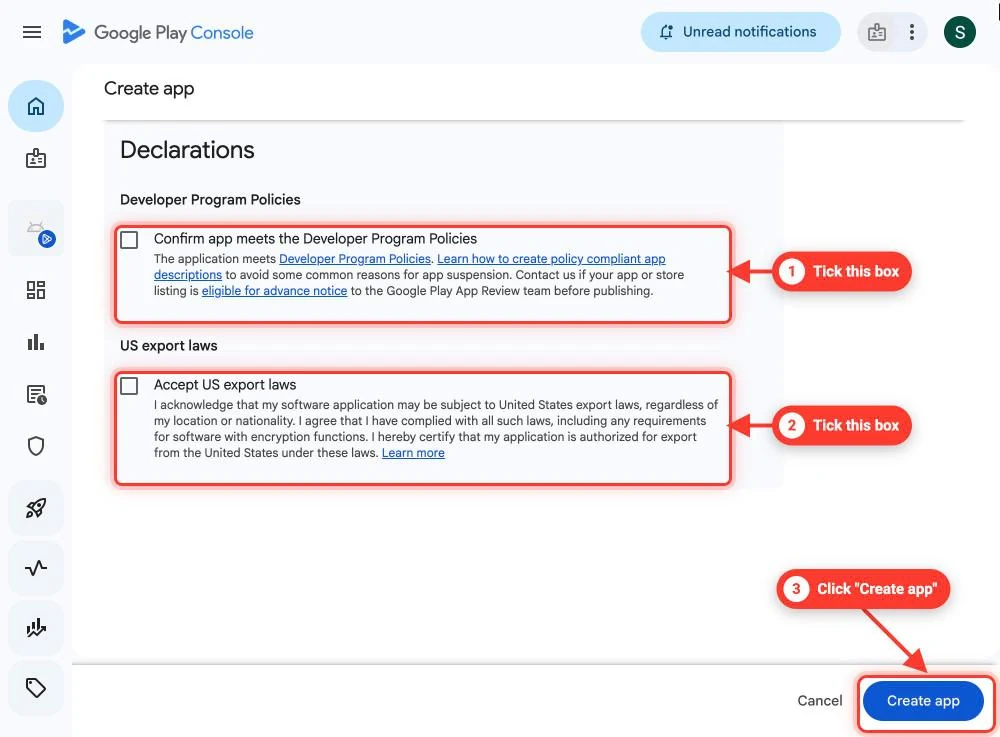
Accept the declarations and create the app
- Scroll to Declarations.
- Tick Confirm app meets the Developer Program Policies.
- Tick Accept US export laws.
- Click Create app, at the bottom right.
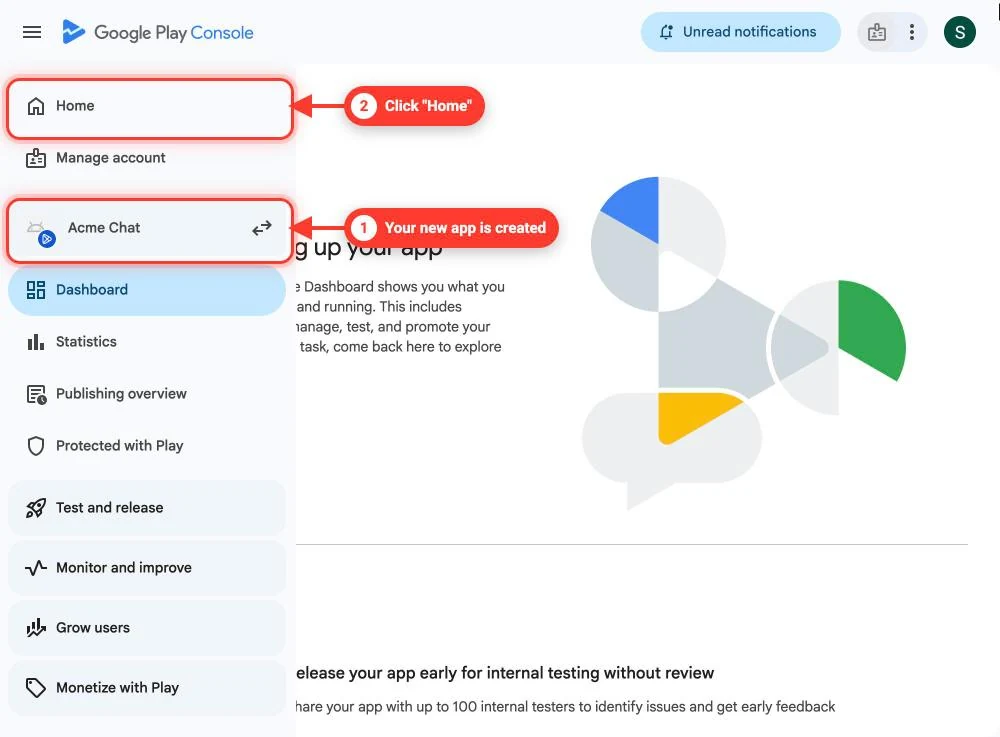
Your app is created
- Play Console opens your new app. Its name shows at the top of the left menu.
- Click Home to go back to the main page. You don't need to fill in anything on the Dashboard: we do that.
Tips:
- Sign in with the account that owns your developer account, or one that is an admin. Other users may not see the buttons.
- The package name says it is taken? Check you pasted it with no space at the start or the end. If it still says taken, don't pick another one: chat with us.
- The two declaration boxes are your company's own agreement with Google, so only you can tick them.
Google's help:
How you know it's done: You tell us here once the app is created.
Step 6. Invite us to your app
Who: You. Time: About 10 minutes.
With these two invites we can upload your app and fill in Google's forms for you. We only get access to this one app: never to your other apps, your payments or your account settings.
What you need to copy:
- First email to invite: shown in your Mobile apps panel, under Android
- Second email to invite:
saasland.company@gmail.com
Do these steps twice
- You invite two emails, one after the other, with the same boxes ticked.
- First: our robot email, shown in your Mobile apps panel. It is our robot account: it uploads your new versions.
- Then: saasland.company@gmail.com. It is our team: we fill in Google's forms for you.
- The screenshots show the second email. The screens are the same for both.
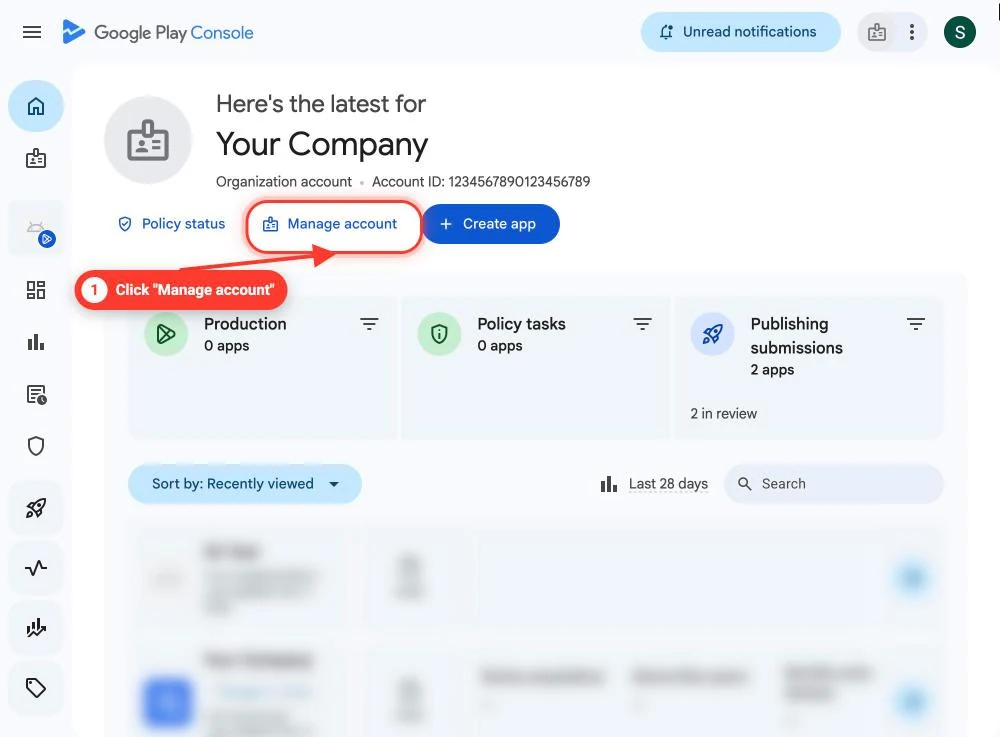
Click "Manage account"
- On the Play Console home page, click Manage account.
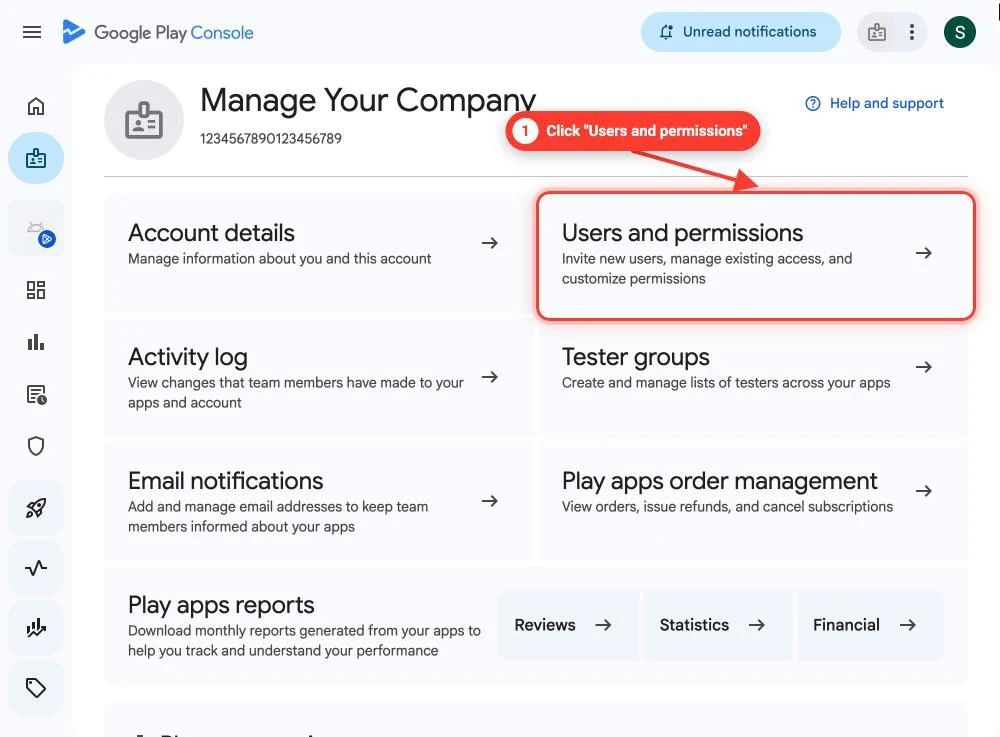
Open "Users and permissions"
- Click the Users and permissions card.
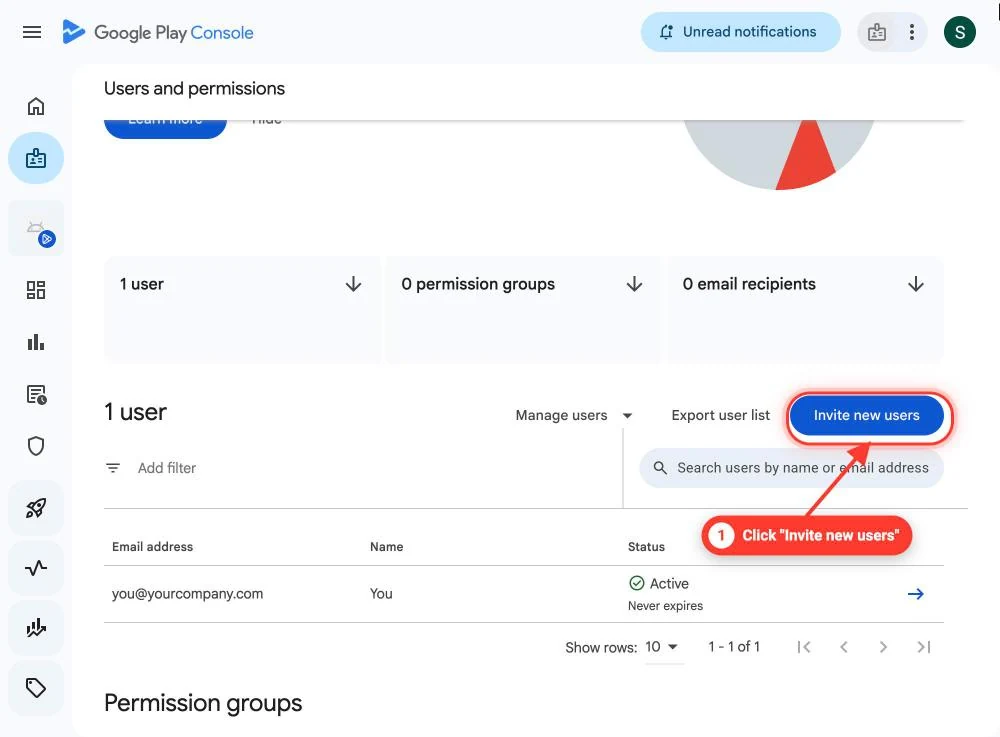
Click "Invite new users"
- Scroll down to the list of users and click Invite new users.
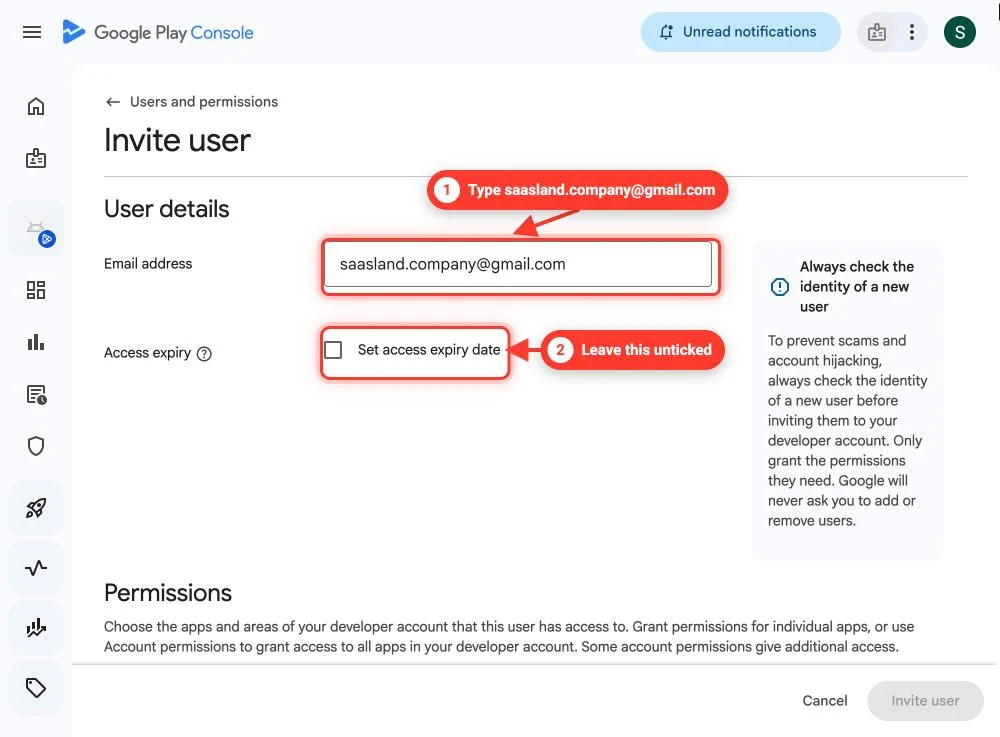
Type our email
- Email address: paste the email you are inviting.
- Access expiry: leave Set access expiry date unticked. We need access for as long as we publish your app.
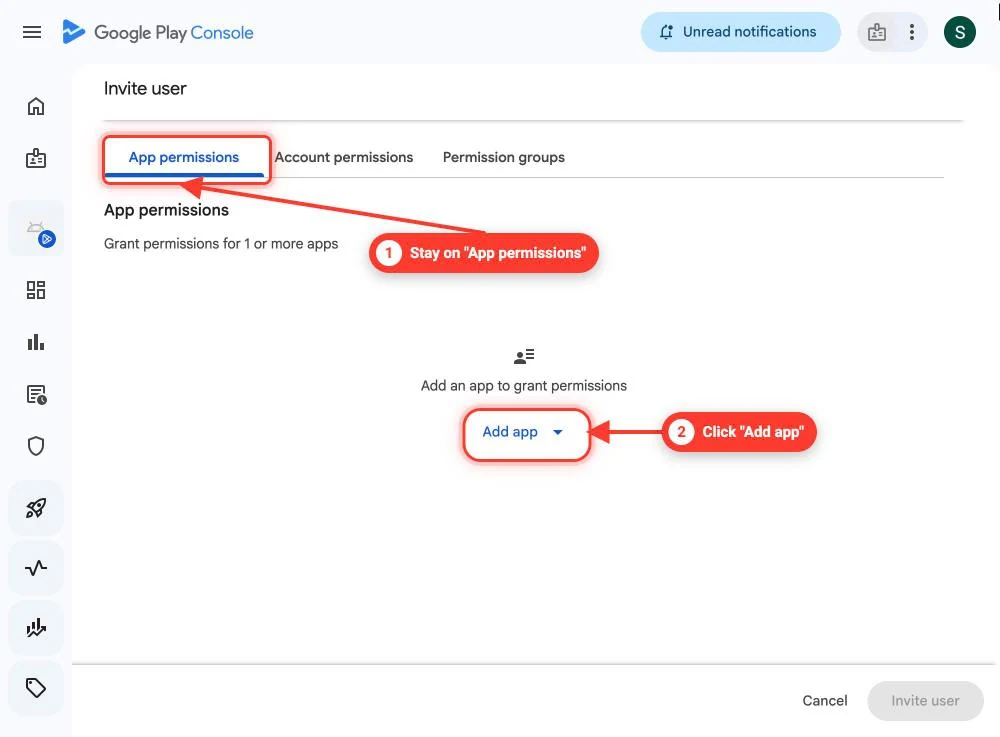
Add your app
- Scroll down to Permissions and stay on the App permissions tab.
- Click Add app.
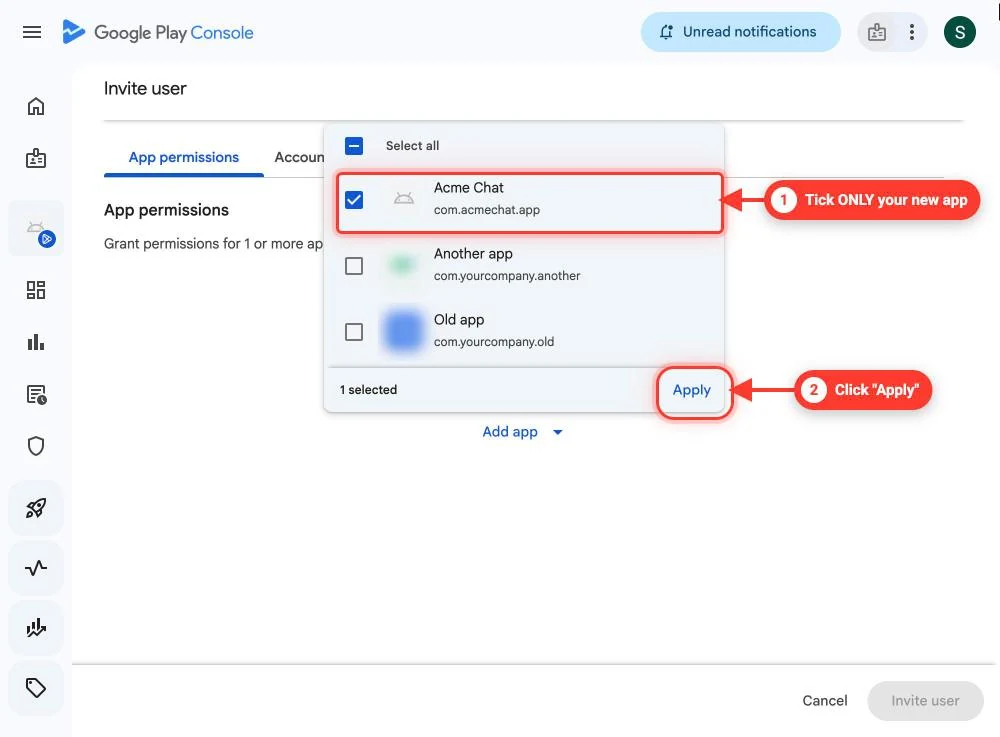
Pick your new app
- Tick only the app you just created. Leave every other app unticked.
- Click Apply.
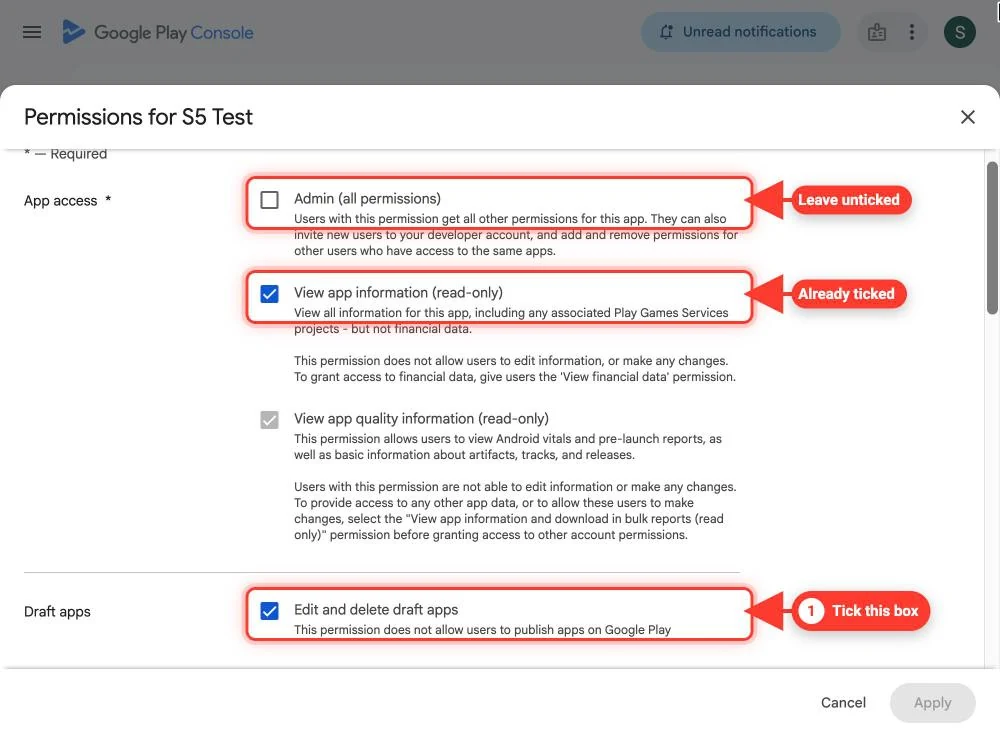
Tick "Edit and delete draft apps"
- Leave Admin (all permissions) unticked.
- View app information is already ticked. Leave it.
- Under Draft apps, tick Edit and delete draft apps.
Tick the three "Releases" boxes
- Scroll down to Releases and tick all three boxes.
- Leave both boxes under Financial data unticked.
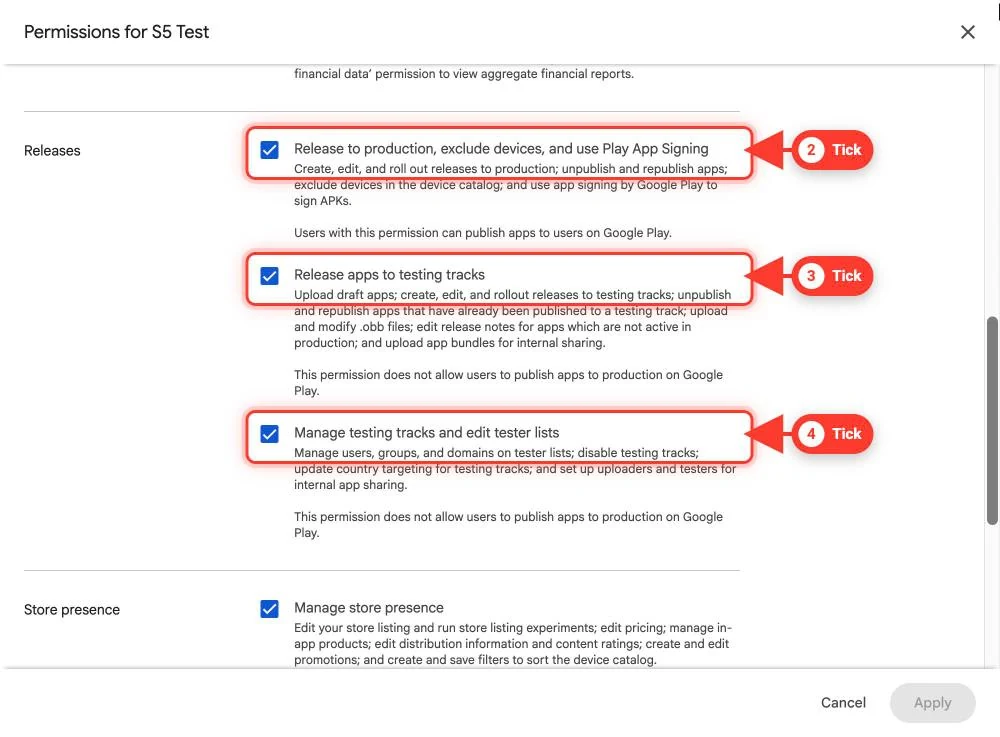
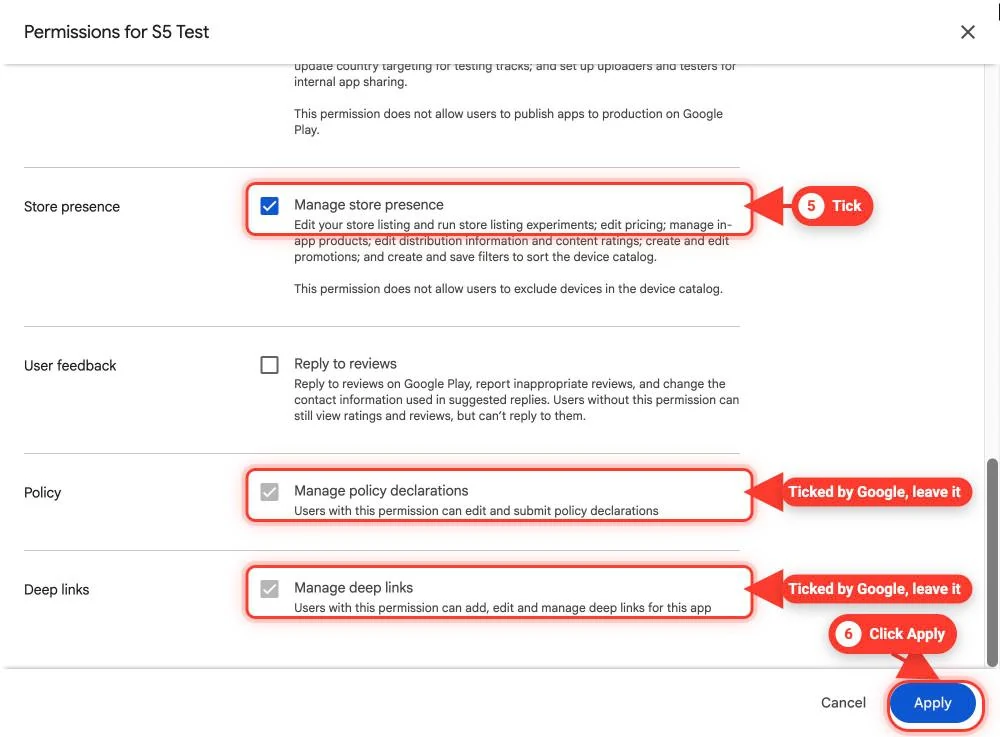
Tick "Manage store presence", then Apply
- Under Store presence, tick Manage store presence.
- Leave Reply to reviews unticked. Google ticks two more boxes on its own: that is fine.
- Click Apply, at the bottom right.
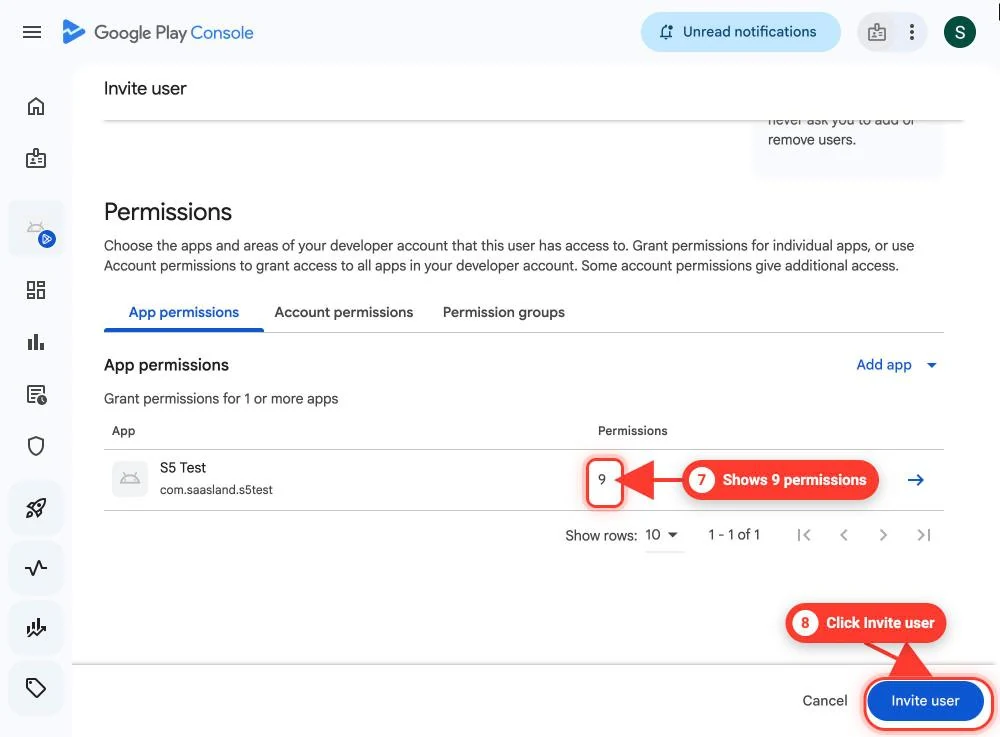
Send the invitation
- Your app now shows 9 permissions: your 5 boxes plus 4 Google ticks for you.
- Click Invite user, at the bottom right.
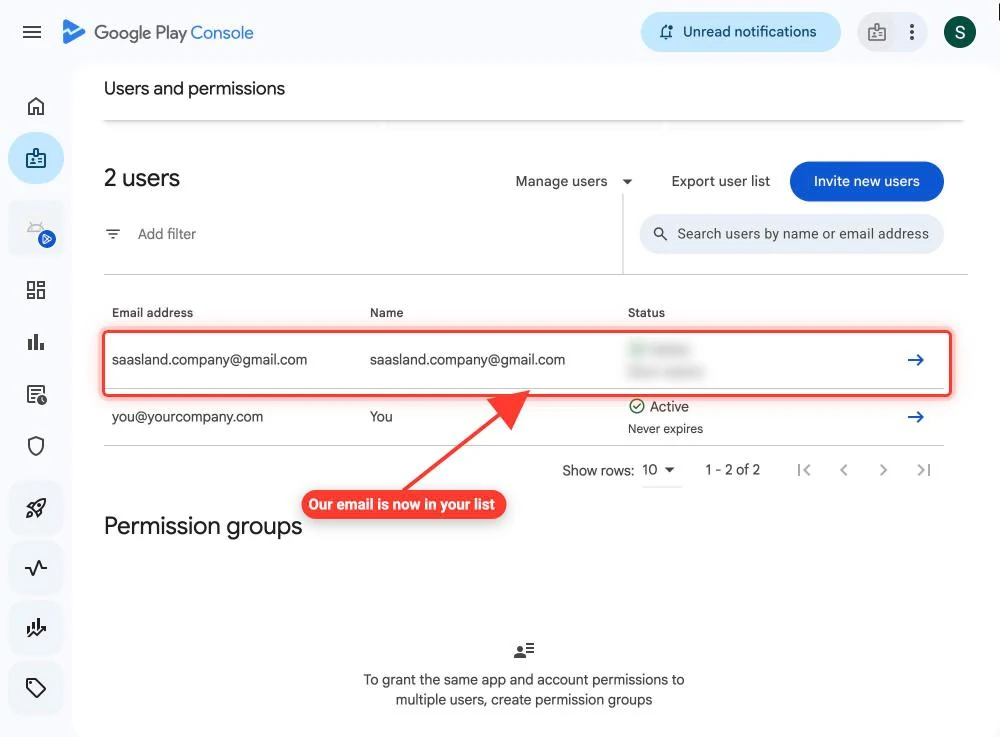
Check the email is in your list
- You are back on Users and permissions, and the email now shows in the list.
- Now do the same for the second email. When both are in the list, press the button below.
Tips:
- In short, you tick 5 boxes: Edit and delete draft apps; Release to production, exclude devices, and use Play App Signing; Release apps to testing tracks; Manage testing tracks and edit tester lists; Manage store presence.
- Not 9 permissions? Click the arrow at the end of the app's row to open the window again and compare.
- Can't see "Invite new users"? Your Google account is not the owner or an admin. Sign in with the owner's account.
Google's help:
How you know it's done: We check it ourselves: this step turns done when our robot account can read your app. Google usually lets it in within minutes.
Step 7. Send Google's policy emails to us too
Who: You. Time: 2 minutes.
If Google has a problem with your app, it emails a warning. With us on the list, we can fix it before it becomes serious.
What you need to copy:
- Email recipient:
saasland.company@gmail.com
In Play Console
- Click Manage account, then Users and permissions.
- Scroll down to Email recipients and click Add email recipient.
- Type saasland.company@gmail.com.
- Under topics, tick Policy. Under apps, pick your new app.
- Save.
Tips:
- Only the account owner or an admin can add email recipients.
Google's help:
How you know it's done: You tell us here once you have added the email.
Step 8. We upload the first version of your app
Who: We do this. Time: Within one working day of your invites.
Google wants the very first version uploaded by hand in Play Console. After that, we upload every new version automatically.
What we do
- We build your app and upload it to internal testing. Nobody outside your team sees it.
- Nothing to do on your side.
How you know it's done: We check it ourselves: this step turns done when Google has the upload.
Step 9. Copy your app signing code
Who: You. Time: 2 minutes, after we uploaded the first version.
Google signs your app with its own key. This code lets your app open your chat links and receive notifications.
In Play Console
- Open your app.
- In the left menu, click Test and release, then App integrity.
- Find App signing key certificate.
- Copy the code next to SHA-256 certificate fingerprint. It looks like AB:12:CD:… with 32 pairs.
In this panel
- Paste it in SHA-256 fingerprint and click Save the fingerprint.
Tips:
- Copy the one under App signing key certificate, not the upload key one.
- You only see it after we uploaded the first version.
Google's help:
How you know it's done: Marked done as soon as the code is saved.
Step 10. Answer Google's questions about your app
Who: Mostly us, with two parts for you. Time: 10 minutes for your two parts.
Google asks 11 questions about every app before it can go public: privacy, ads, age rating and more. We answer most of them. Two need you.
Your part 1: a test login for Google's reviewers
- Google's reviewers need to sign in to your app. Create a test user in your console just for them.
- In Play Console, open your app, then Policy and programs, then App content.
- Under Sign-in details, click Start.
- Type the test user's email and password in English, and tick that it gives full access.
- Click Add, then Save. Add alone does not save.
Your part 2: trader status
- In App content, open Trader status and say whether your company sells to people in the EU or UK as a business.
- If you are a trader, give the link to your terms of service.
- This is your company's own legal answer, so only you can give it.
What we do
- We answer the other 9 questions: privacy policy, ads, age rating, target audience, data safety and the rest.
Tips:
- Do your part 1 first: Google keeps the age and data safety answers as drafts until the sign-in details are saved.
- Use a test user, never your own login. Keep its password working: if it expires, Google can reject your app.
- Not sure about trader status? Google cannot decide it for you; ask your accountant or lawyer.
Google's help:
How you know it's done: We mark it done when all 11 answers are in. Chat with us once your two parts are saved.
Step 11. We make the app free and choose the countries
Who: We do this. Time: Within one working day.
Google needs to know where your app is offered.
What we do
- We make the app free and offer it in every country Google allows.
- Want fewer countries? Tell us in the chat.
How you know it's done: We mark it done when it is set.
Step 12. We make the store images
Who: We do this. Time: Within two working days.
Google needs a banner image and phone screenshots for your store page.
What we do
- We make the banner and the screenshots from your icon and your listing, and upload them.
- Prefer your own? Send them to us in the chat.
How you know it's done: We mark it done when the images are uploaded.
Step 13. Test your app with 12 people for 14 days
Who: You. Time: 14 days, plus the time to find 12 people.
Google asks this of Personal accounts made after 13 November 2023 before an app can go public.
Find your testers
- Find at least 12 people with an Android phone who will keep your app for 14 days in a row.
- Send us their Google account emails in the chat. We add them to a closed test.
During the 14 days
- Each tester accepts the invitation from Google and installs the app.
- Ask them to open it now and then. Google counts people who stay in the test.
Tips:
- Google counts only testers who stay in the test for the whole 14 days. Invite a few more than 12.
Google's help:
How you know it's done: You tell us here when the 14 days are over.
Step 14. Ask Google to let your app go public
Who: You. Time: 10 minutes, then a few days for Google's answer.
After the test, Google asks a few questions before it lets your app go public.
In Play Console
- Open your app and go to its Dashboard.
- Click Apply for production and answer Google's questions about your test.
- Wait for Google's email.
Tips:
- Answer in your own words: how many people tested, what they said, and what you changed.
Google's help:
How you know it's done: You tell us here when Google says yes.
Step 15. Your app goes public
Who: We do this. Time: A few days for Google's review, sometimes more.
When everything above is done, your app is ready for Google's review.
Your OK
- On your Android card, click Approve and send to Google.
What we do
- We start your first public release in Play Console.
- Google reviews it and emails you. We show its answer on your Android card.
Tips:
- If Google says no, we tell you why and what we change.
How you know it's done: We mark it done when Google has accepted your first public release.
After that
You can see our access at any time in Play Console, under Manage account → Users and permissions, and remove it there whenever you want. If you remove it, we can no longer update your app.
Stuck on a step? Chat with us from your panel.