

This guide walks you through publishing your own iPhone app on the App Store, step by step.
You join the Apple Developer Program as a company and add our account to your Apple team. We create your app, fill in App Store Connect, build the app and upload it to your account, and you send it to Apple's review. Your app is published under your company's name. Some steps are yours, some are ours: each one says who does it.
You can follow the same guide, with your own app's details filled in, in your Mobile apps panel, under iPhone.
Before you start
A registered company. Apple publishes your app under your company's legal name, so you join as an organization. You need the right to sign for your company.
A D-U-N-S number. A free number that identifies your company. Apple's lookup tool finds yours, or asks for one for you. A new number can take up to 5 working days, and Apple sees it up to 2 days later. Never pay to speed it up: it does not make Apple faster.
A website and a work email. Your company's public website, and an email address on its domain, such as you@acmechat.com. Apple checks both.
Apple's fee: US$99 a year. Or the local price where you are. You pay Apple directly, after Apple has checked your company. We never see your payment details. Your app is free, so Apple's tax and banking forms are not needed.
An Apple Account with two-factor authentication. Best a new one, made with your work email, used only for your company's apps. Apple asks for a code on a trusted phone each time you sign in.
How long it takes you. About an hour for Apple's forms. Then Apple checks your company: it may call or email you, and it does not say how long it takes, so allow one to two weeks. After that, about 30 minutes, spread over the steps below. Once you add us to your Apple team, we do the rest in App Store Connect for you.
Step 1. Join the Apple Developer Program as a company
Who: You. Time: About an hour of forms, then one to two weeks while Apple checks your company.
Your app is published under your company's own Apple account, so your name shows in the App Store, not ours.
Make your Apple Account
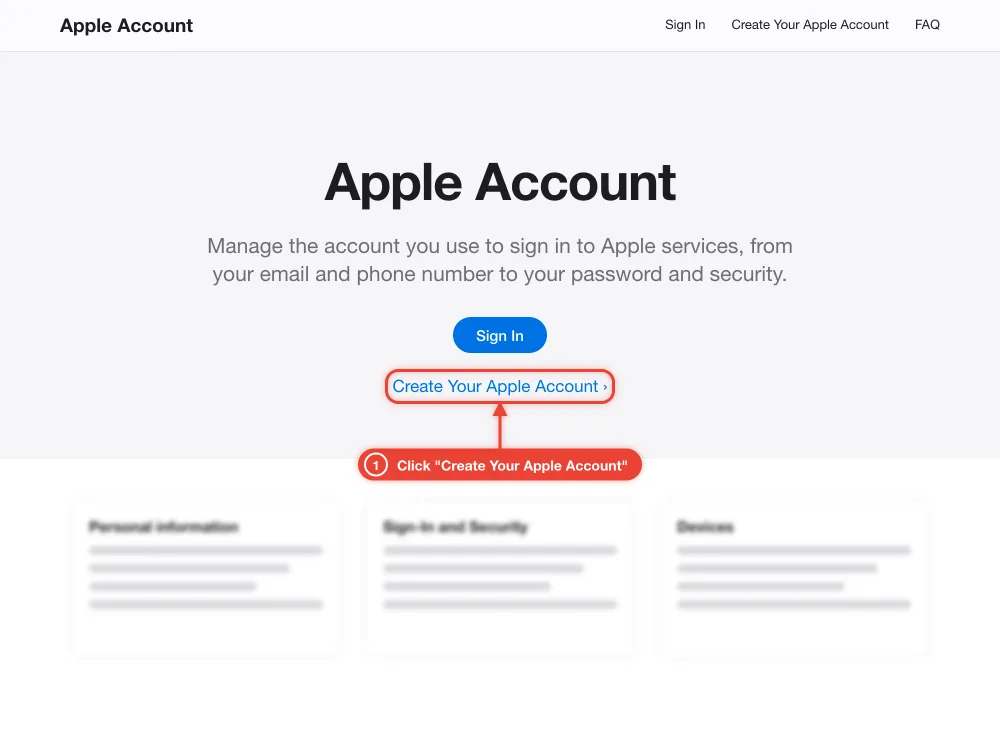
- Open Apple's account page and click Create Your Apple Account.
- Use your work email. Turn on two-factor authentication with a phone you keep.
Enroll your company
- Open Start your enrollment and sign in with that Apple Account.
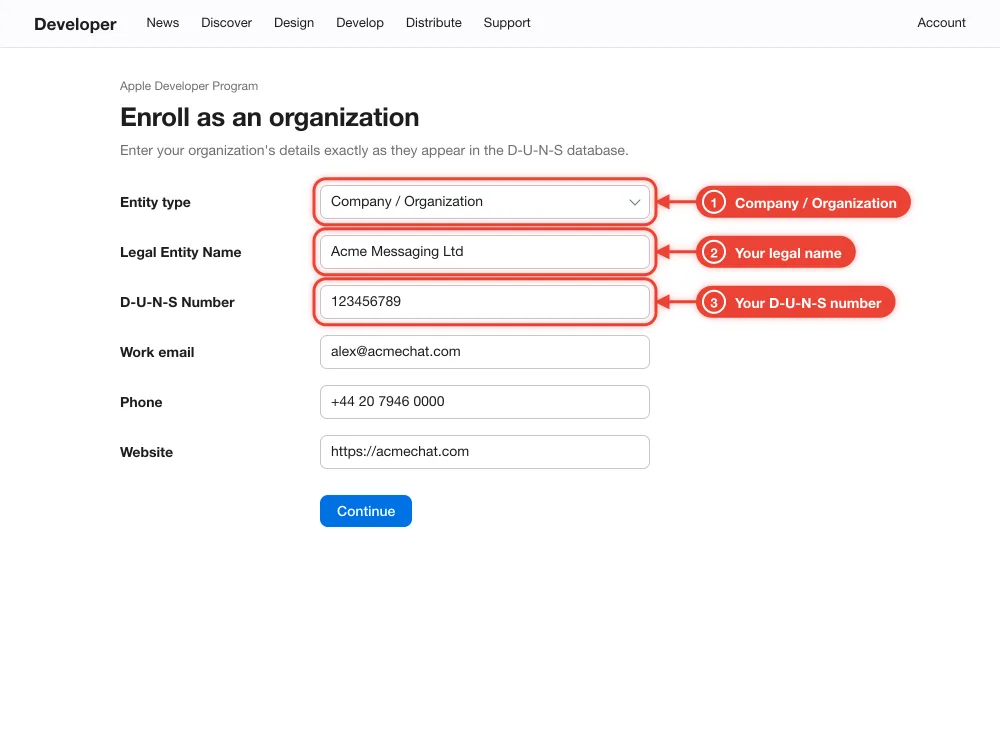
- Choose Company / Organization as the entity type.
- Type your company's legal name exactly as it is registered, and your D-U-N-S number.
- Fill in your work email, phone and website, then send the form.
Pay and wait
- Apple checks your company. It may call or email you, or ask for documents. Answer quickly: that is what makes it faster.
- When Apple approves you, it emails you a link to pay the yearly fee. Pay it.
Accept Apple's agreement
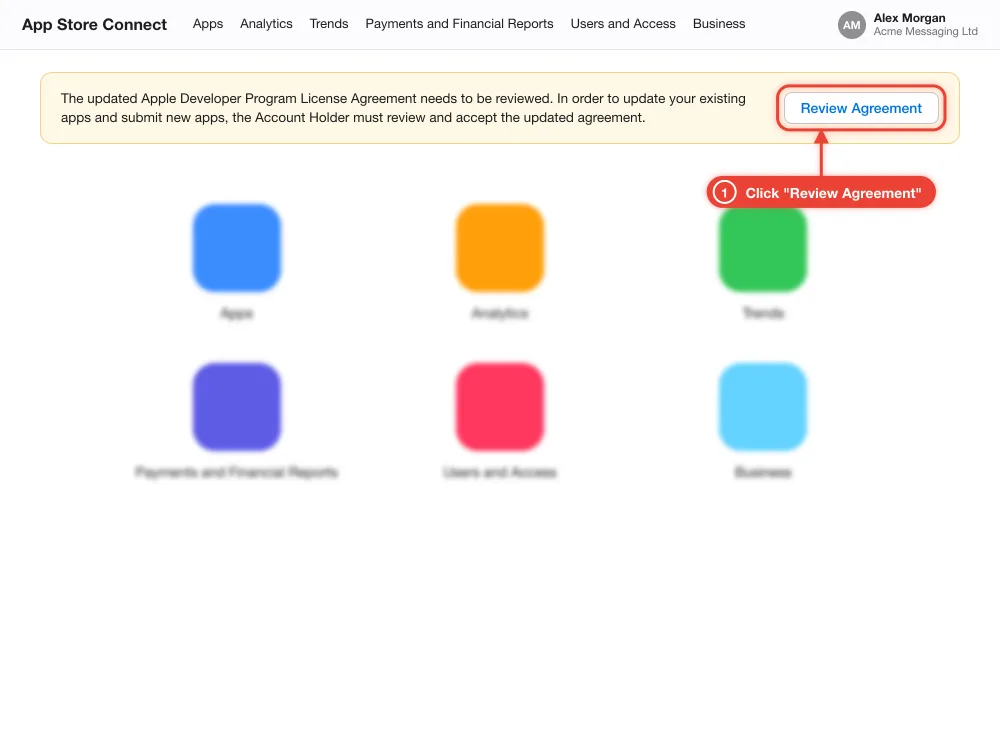
- Sign in at App Store Connect. A banner asks you to review the Apple Developer Program License Agreement.
- Click Review Agreement, read it and accept it. Only the person who enrolled (the Account Holder) can do this.
Tips:
- Already in the Apple Developer Program as a company? Skip to accepting the agreement, then tick this step.
- Apple updates its agreement from time to time. Until the Account Holder accepts the new one, nobody can update your app. We tell you here when that happens.
Apple's help:
- Start your enrollment
- What Apple asks for when you enroll
- About the D-U-N-S number
- Sign and update agreements
How you know it's done: You tell us here once Apple has approved your membership and you have accepted the agreement.
Step 2. Add us to your Apple team
Who: You and us. Time: 5 minutes, plus Apple's approval of API access the first time (usually quick, Apple does not say how long). We accept your invitation within one working day.
With access to your team we register your app, build it, sign it, upload it and fill in App Store Connect for you, with our own login. You never share your password or a key.
What you need to copy:
- Email to invite:
saasland.company@gmail.com - Role:
Admin
Turn on API access (once)
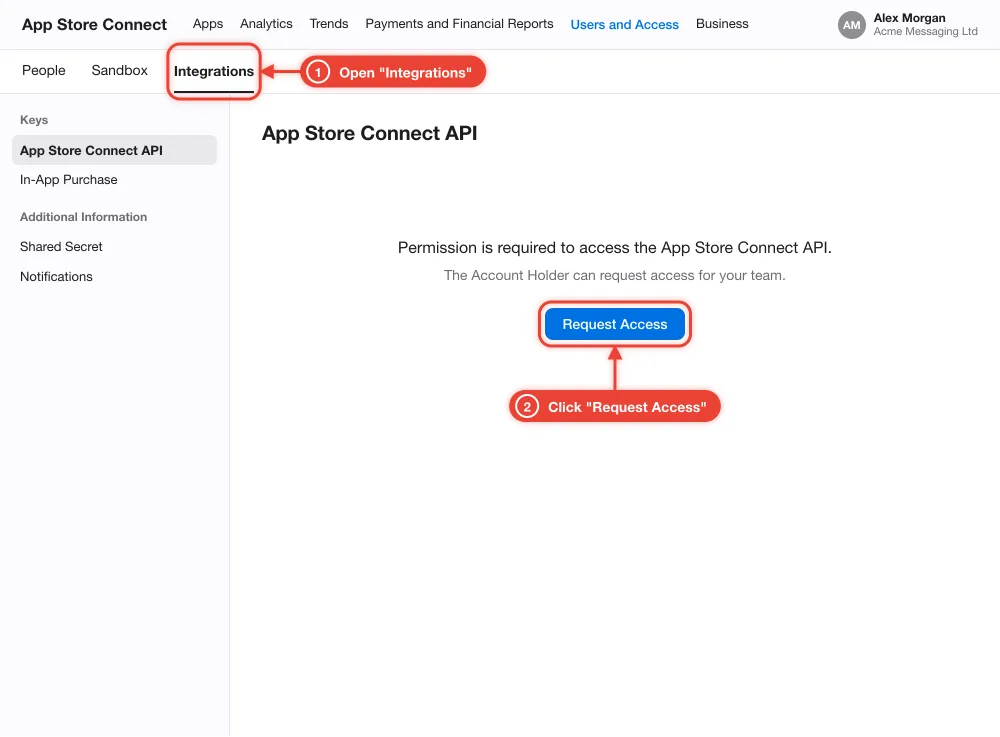
- In App Store Connect, open Users and Access, then the Integrations tab, then App Store Connect API.
- Click Request Access, tick the terms and send it. Only the Account Holder can do this, once. It lets us create a key inside your team.
Invite us
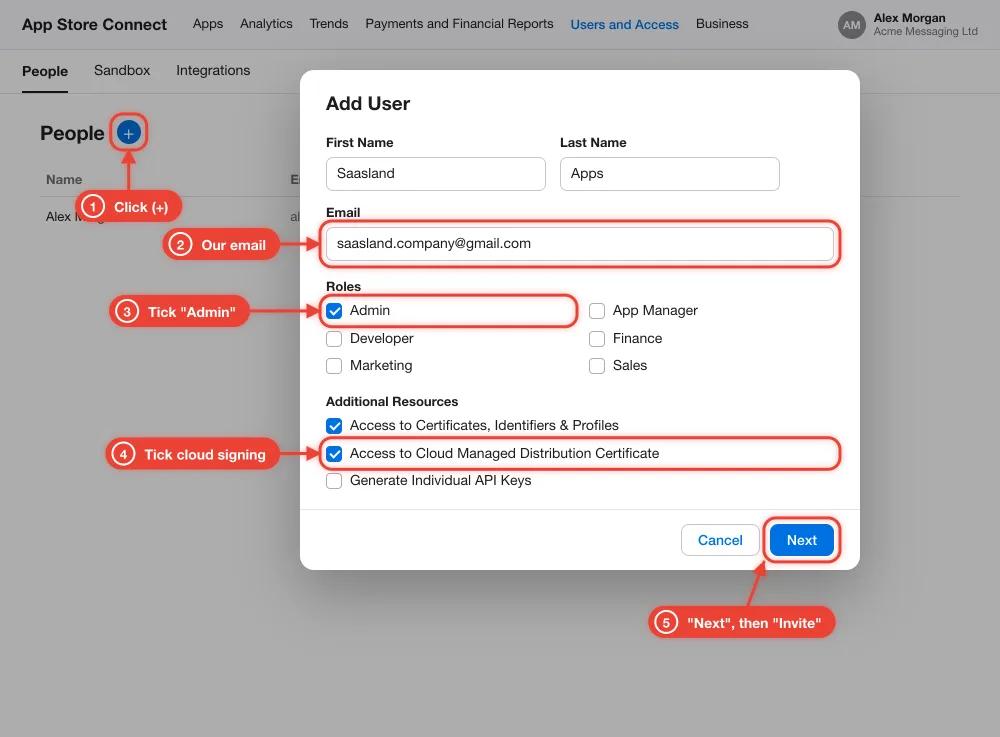
- Open Users and Access, then the People tab, and click the (+) button.
- First name Saasland, last name Apps, email saasland.company@gmail.com.
- Under Roles, tick Admin.
- Under Additional Resources, tick Access to Cloud Managed Distribution Certificate. Admins already have Certificates, Identifiers & Profiles.
- Click Next, then Invite. Only the Account Holder or an Admin can invite an Admin.
What we do next
- We accept your invitation, then create a Team key inside your team with the Admin access, and connect it here. The key never leaves our side.
- This step turns done on its own as soon as Apple accepts the key.
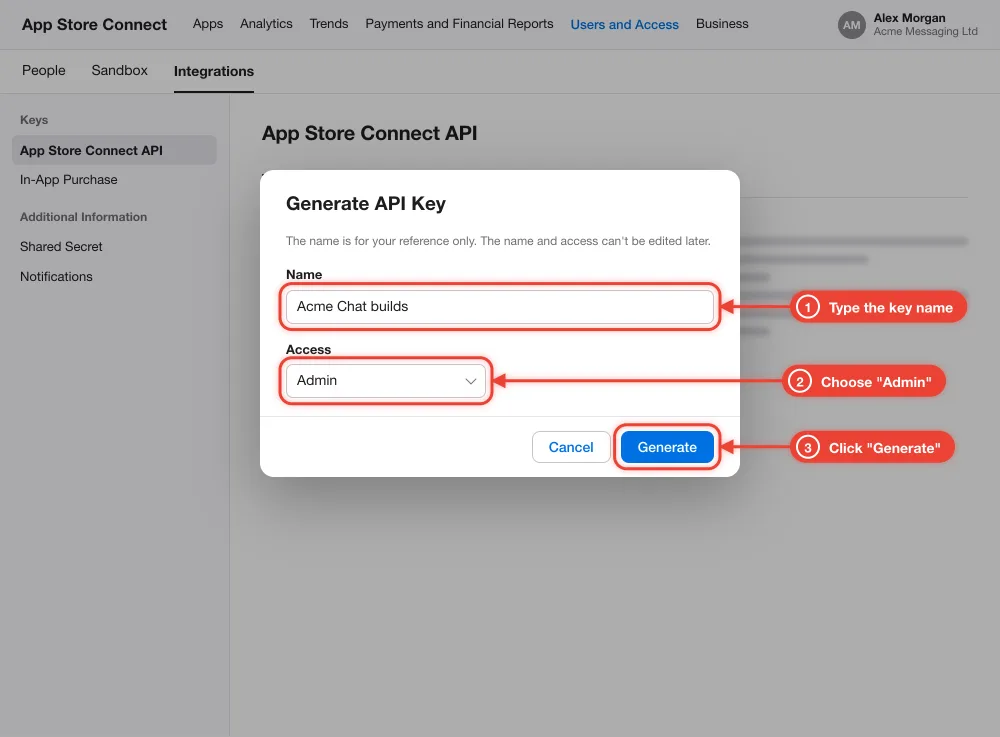
Or make the key yourself
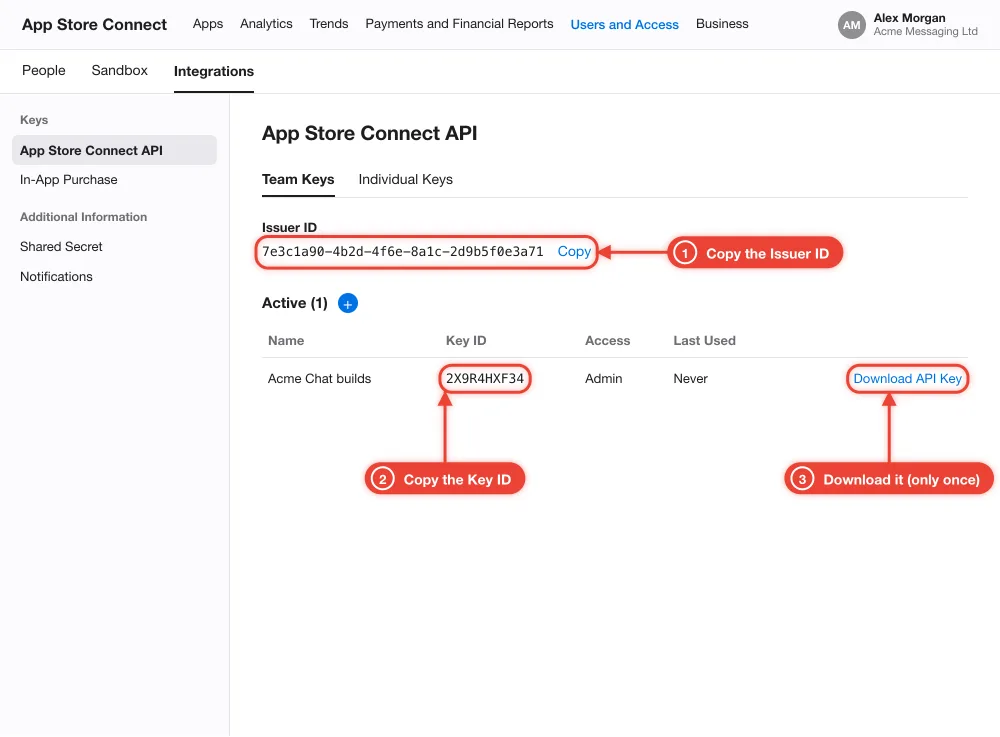
- Only if you would rather not invite us: an Admin opens the Team Keys tab, creates a key with the Admin access, and copies the Issuer ID and the Key ID.
- Click Download next to the key. Apple lets you download the .p8 file only once.
- Below, choose the .p8 file, paste the Key ID and the Issuer ID, and click Connect the key. We still need to be in your team for the steps Apple keeps to its website.
Tips:
- Apple's invitation expires after 3 days. Send it on a working day: if it expires, send it again from the same page.
- Why Admin: Apple lets only an Admin register your app's ID, make the push key and create the key that builds and signs your app in Apple's cloud. Admin access does not show your bank, tax or payment details.
- Admin access shows us every app in your team. We work only on the app we make for you, as the mobile app addendum says.
- You can remove us at any time in Users and Access. We then can no longer update your app.
Apple's help:
- Open Users and Access
- Add and edit users
- Role permissions
- Open the App Store Connect API page
- App Store Connect API keys
How you know it's done: Marked done as soon as Apple accepts the key we create in your team.
Step 3. We register your app's ID
Who: We do this. Time: A few minutes after the key is connected.
Apple identifies your app by its bundle ID. We register it in your account, with push notifications and links turned on.
What you need to copy:
- Bundle ID: shown in your Mobile apps panel, such as
com.acmechat
What we do
- We register your bundle ID (such as
com.acmechat) in your Apple account. - You will see it in Certificates, Identifiers & Profiles, under Identifiers. Nothing to do on your side.
Tips:
- If this step waits for long, check that we are still in your team as an Admin.
How you know it's done: Marked done as soon as Apple has the bundle ID.
Step 4. We create your app in App Store Connect
Who: We do this. Time: Within one working day of the step above.
Your app needs a page in App Store Connect before anything can be uploaded to it. We make it with your details.
What you need to copy:
- Name: your app name, such as
Acme Chat - Bundle ID: shown in your Mobile apps panel, such as
com.acmechat - SKU: shown in your Mobile apps panel, such as
com.acmechat
What we do
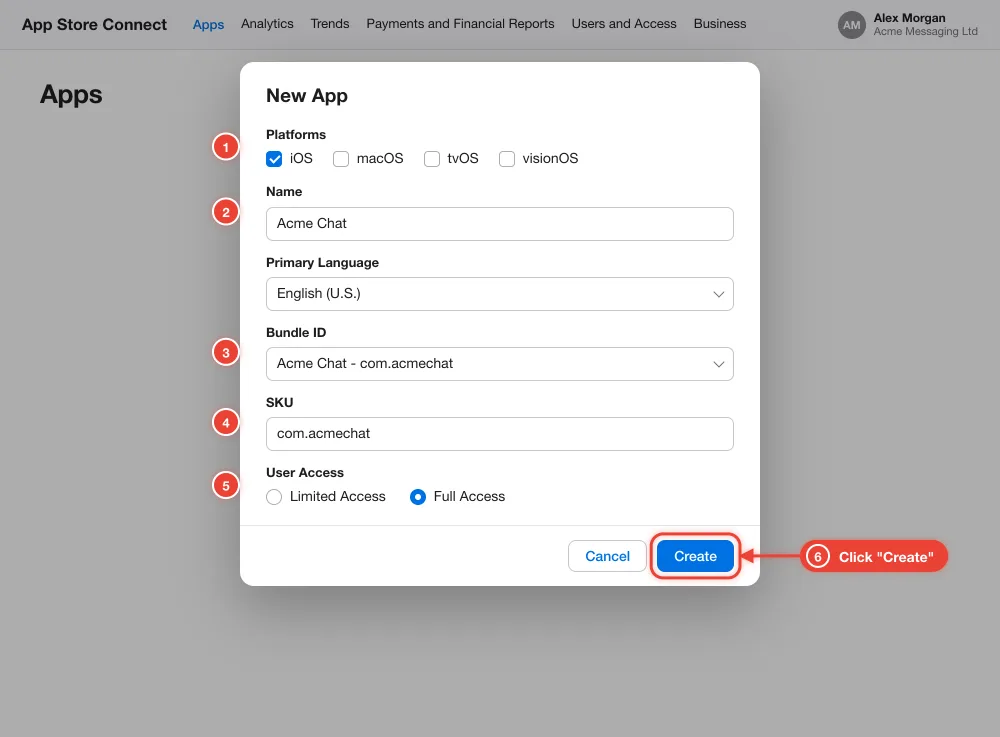
- In Apps, we click (+), then New App.
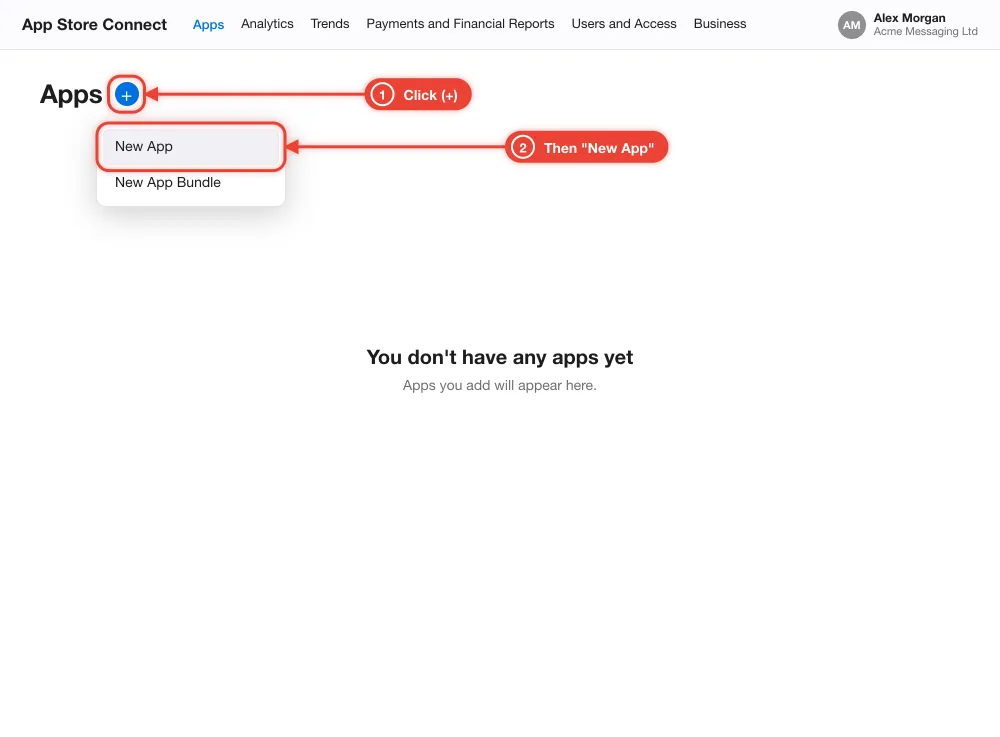
With these details
- iOS, Name your app name (such as Acme Chat), your app's main language, Bundle ID your bundle ID (such as
com.acmechat), SKU your bundle ID (such ascom.acmechat), Full Access. - Then Create. You will see your app in Apps.
Tips:
- Your first app only: Apple asks for a Company Name, shown under your app in the App Store, which can never be changed. We use your company's legal name, as Apple has it. Want a registered trade name instead? Tell us in the support chat before this step.
- Apple says the name is taken? Another app uses it. We tell you, and you pick another name in your listing here.
Apple's help:
How you know it's done: Marked done as soon as we see your app in App Store Connect.
Step 5. Write your store listing
Who: You. Time: About 15 minutes.
This is what people read about your app in the App Store.
In this panel
- App name (30 characters), Subtitle (30), Description (4,000), Keywords separated by commas (100).
- Support URL and Privacy policy URL: pages on your own website, starting with https://.
- Copyright: the year and your company's legal name, such as 2026 Acme Messaging Ltd.
- Click Save the listing.
What we do
- We copy your listing into your app in App Store Connect: the version page and App Information.
Tips:
- Write it in your own words, about your own customers. Apple turns down apps whose text looks like many others.
- Never use "WhatsApp" in your app name, subtitle or keywords: it belongs to another company.
Apple's help:
How you know it's done: Marked done as soon as the listing is saved and complete here.
Step 6. Upload your app icon
Who: You. Time: 2 minutes.
Your icon shows in the App Store and on people's phones. We build it into your app, and Apple takes it from there.
In this panel
- Choose a square PNG image of 1024 × 1024 pixels, with no see-through parts and no rounded corners: Apple rounds them.
- Click Upload the icon.
Tips:
- Keep it simple: a logo on a plain background reads best at small sizes. Do not copy another app's icon.
How you know it's done: Marked done as soon as the icon is uploaded.
Step 7. Confirm the content rights answer
Who: You and us. Time: 2 minutes.
Apple asks whether your app shows content that belongs to others. We fill it in; it is your company's answer, so you confirm it.
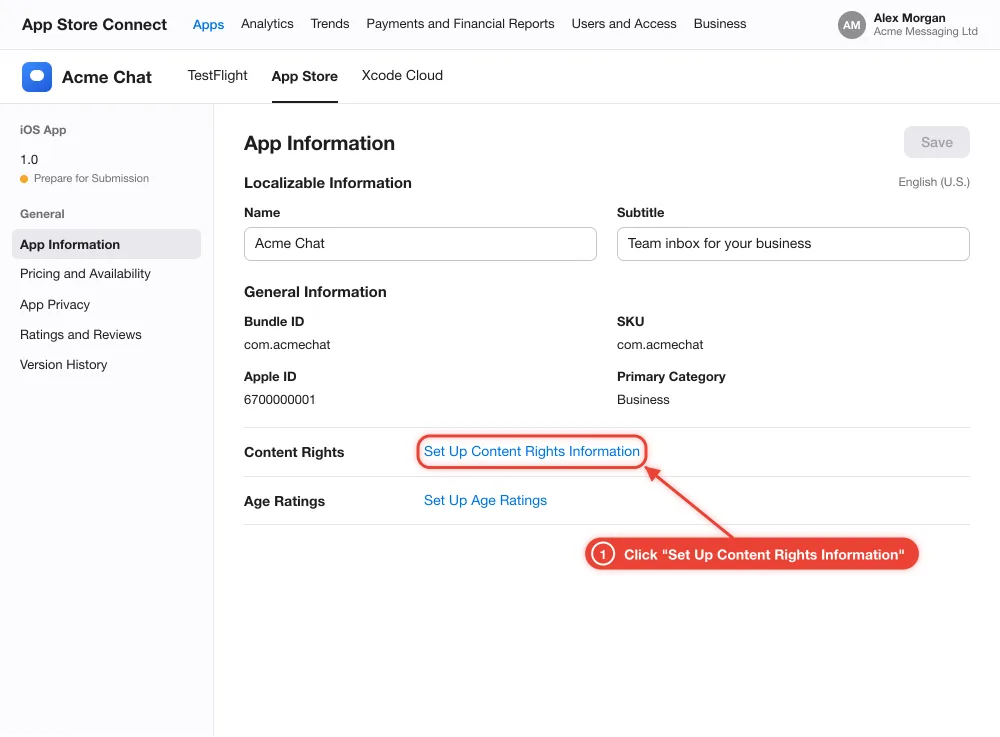
Our answer, in App Information
- Under Content Rights, we choose Yes, it contains, shows, or accesses third-party content, and I have the necessary rights: your app opens your customers' WhatsApp Business conversations, through our platform's access.
- If that is right for your company, tick the step below.
Tips:
- Not sure? Ask us in the support chat before you tick.
Apple's help:
How you know it's done: You tell us here that the answer is right.
Step 8. We set your age rating
Who: We do this. Time: Within one working day.
Every app needs one before Apple reviews it. Yours is a business messaging app, so most answers are No.
The answers we give
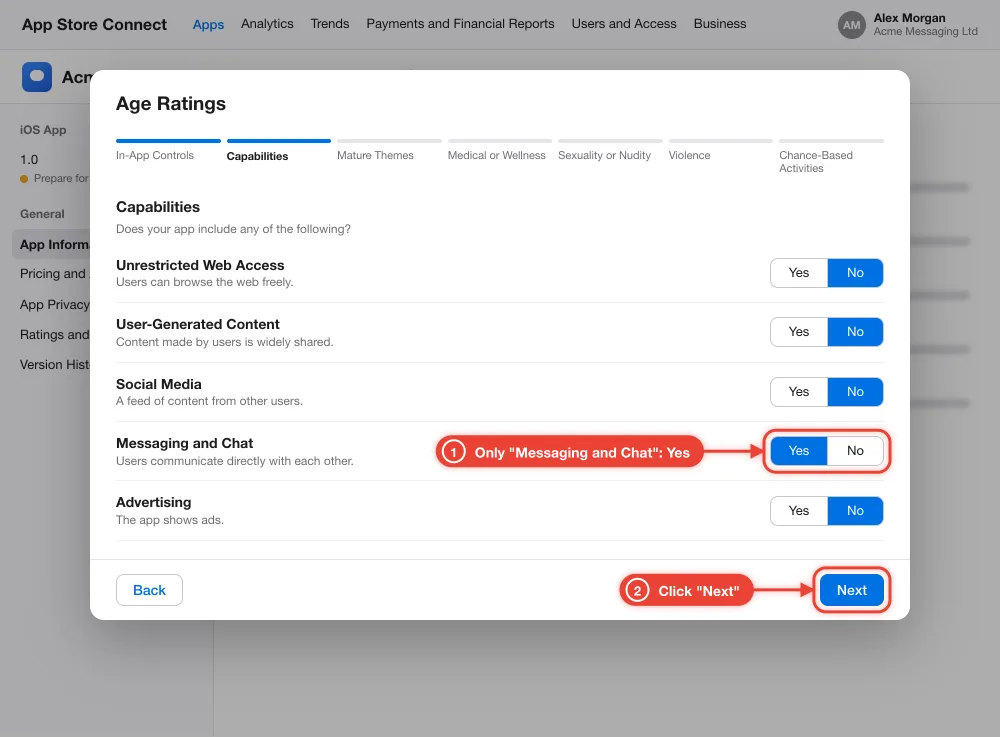
- Under Capabilities, Yes only to Messaging and Chat. No to Unrestricted Web Access, User-Generated Content, Social Media and Advertising.
- None or No to everything else: mature themes, medical topics, violence, gambling and the rest.
- Age Categories and Override: Not Applicable.
Tips:
- Added features of your own to the app? Tell us in the support chat, so the answers stay true.
Apple's help:
How you know it's done: Marked done as soon as we see the answers in App Store Connect.
Step 9. Choose your app's countries
Who: You and us. Time: 2 minutes.
Apple needs a price and a list of countries before it reviews the app. Your app is free; you choose where it is offered.
Your choice
- By default your app is offered in all countries and regions. Want fewer? Tell us which in the support chat.
- Then tick the step below.
What we do
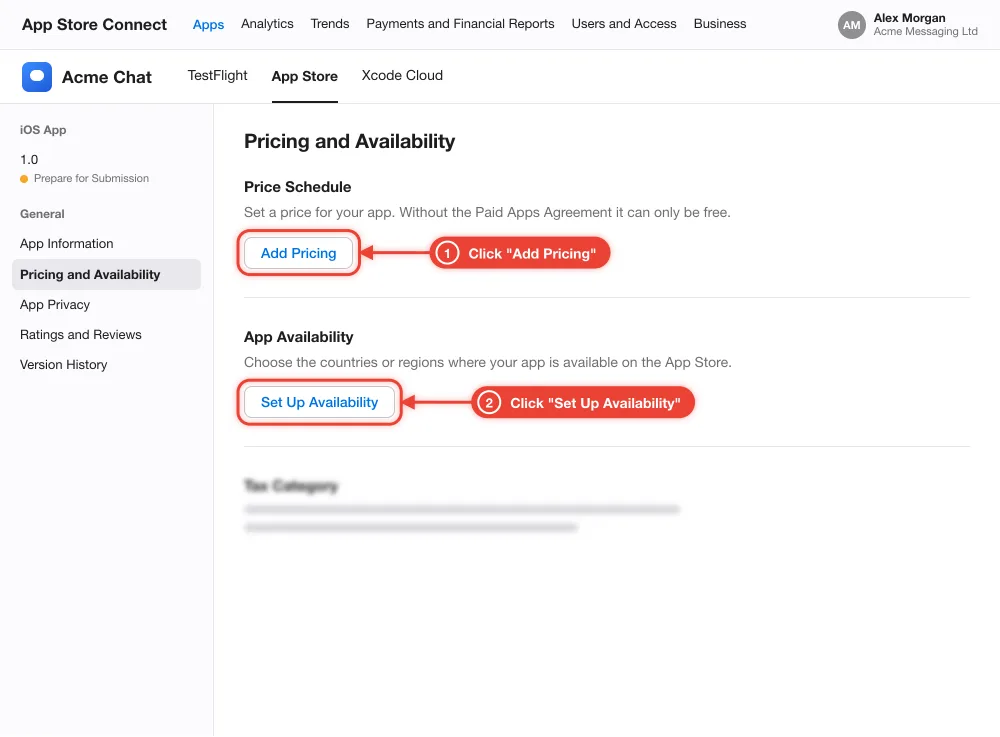
- In Pricing and Availability, we set the price to Free and the countries you chose.
Tips:
- In the European Union, the App Store shows your contact details next to your app (see the next step). Leave out the countries where you do not want it.
Apple's help:
How you know it's done: You tell us here once your countries are chosen.
Step 10. Say whether you are a trader, and confirm App Privacy
Who: You and us. Time: About 10 minutes.
Two statements only your company can make: whether you sell to people in the European Union as a business, and what data the app collects.
Trader status (European Union): yours
- In App Store Connect, open Business, then the Agreements tab. Under Compliance, next to Digital Services Act, click Complete Compliance Requirements.
- Choose whether your company is a trader. A trader verifies a phone and an email by code; the App Store then shows your address, phone and email in the EU.
- Apple cannot decide it for you, and neither can we.
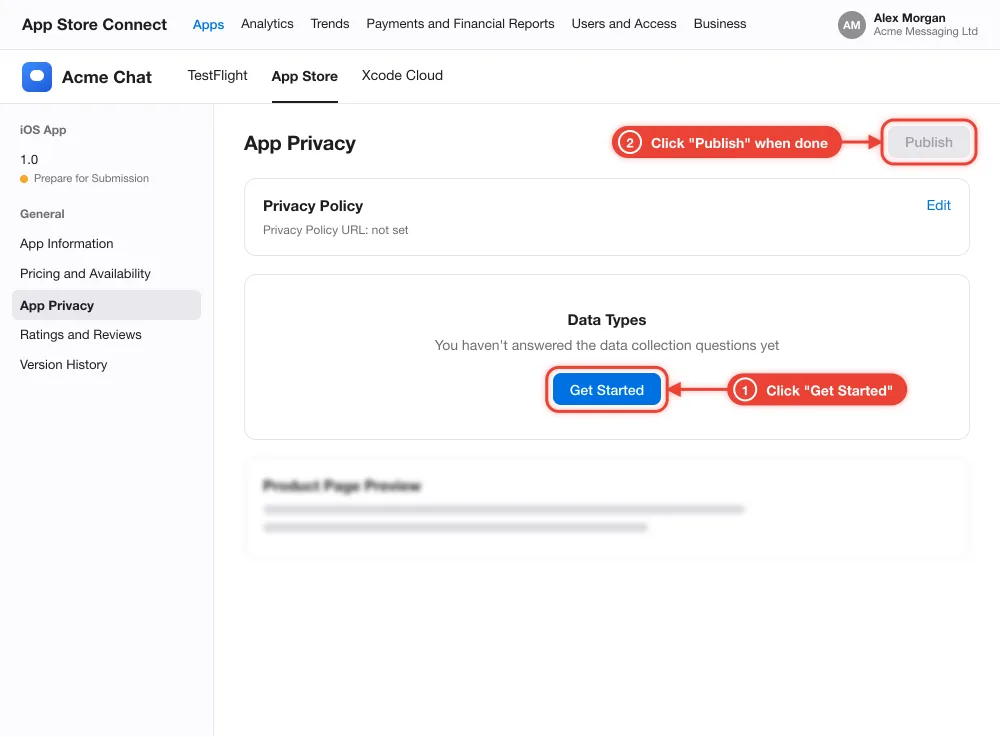
App Privacy: we fill it in, you check it
- We add your privacy policy URL and these answers: Name and Email Address (Contact Info); Emails or Text Messages, Photos or Videos and Other User Content (User Content); User ID and Device ID (Identifiers); Crash Data (Diagnostics).
- Each one is used for App Functionality only, linked to the user and not used for tracking. Then we publish them.
- Open your app, then App Privacy, and check they match your privacy policy.
Tips:
- These answers are your company's statements to Apple. If your privacy policy says more, tell us in the support chat and we change them.
- Your app is free and has no purchases inside, so you do not need the Paid Apps agreement, tax or banking.
Apple's help:
How you know it's done: You tell us here once your trader status is set and the App Privacy answers are right.
Step 11. We connect your push notification key
Who: We do this. Time: Within one working day.
Your app tells your team about new messages with push notifications. Apple sends them only with a key from your account.
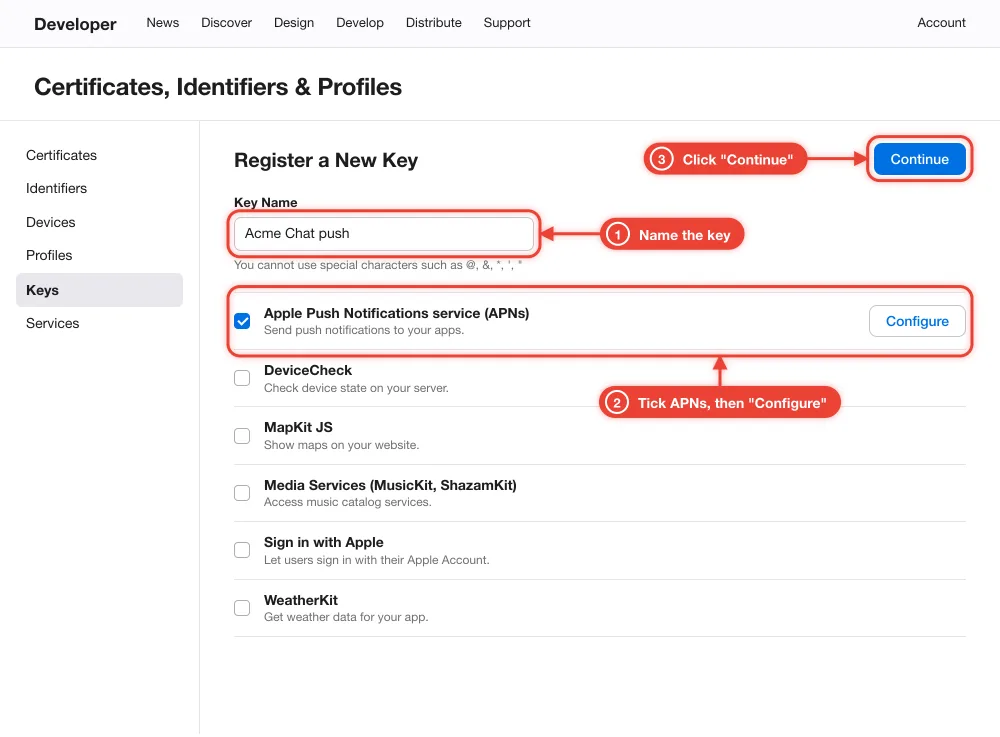
What you need to copy:
- Key name: your app name, such as
Acme Chatpush
What we do
- In Certificates, Identifiers & Profiles, under Keys, we register a key with Apple Push Notifications service (APNs), and connect it to our push service.
Tips:
- Apple allows only a few push keys per team. If yours has no room left, we tell you which unused one to revoke.
Apple's help:
How you know it's done: We mark it done once the key is connected to our push service.
Step 12. Give Apple's reviewers a way in
Who: You. Time: 10 minutes.
Apple's reviewers sign in to your app to test it. Without a working login, Apple turns the app down.
What you need to copy:
- Notes for Apple: your app name, such as
Acme Chatis our company's team inbox for WhatsApp Business conversations. Our customers' staff use it to answer their customers, assign chats to teammates and get a push notification for each new message. Sign in with the demo account above: it is connected to a test number with sample conversations. Native features: push notifications for new messages, a native sign-in and offline screen, opening a chat from a notification, sharing photos and files into a chat, and taking photos with the camera. People can delete their account in Settings, Account, Delete account.
Make a demo login
- In your own console, create a user for Apple's reviewers, with a password that does not expire and no extra sign-in code.
- Make sure it shows a connected number with a few sample conversations: an empty inbox looks like an app that does nothing.
In App Store Connect
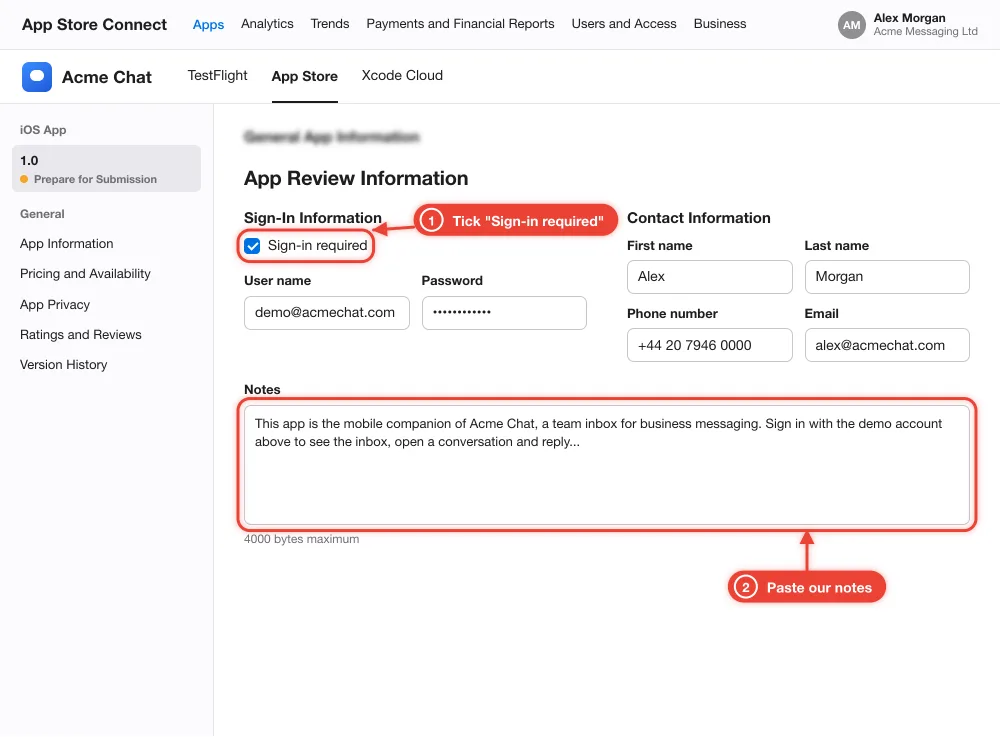
- Open your app, then 1.0 Prepare for Submission, and scroll to App Review Information.
- Tick Sign-in required and type the demo user's email and password.
- Fill in your own name, phone (with the country code, such as +44 20 7946 0000) and email: Apple contacts you, not us.
- Paste the notes above in Notes, then click Save.
Tips:
- Keep the demo user working for as long as your app is in the App Store: Apple reviews every update too.
Apple's help:
How you know it's done: You tell us here once it is saved.
Step 13. Check your iPhone screenshots
Who: You and us. Time: 5 minutes.
Screenshots show your app in use on the App Store page. Apple wants the app itself, not a logo or a sign-in page.
What we do
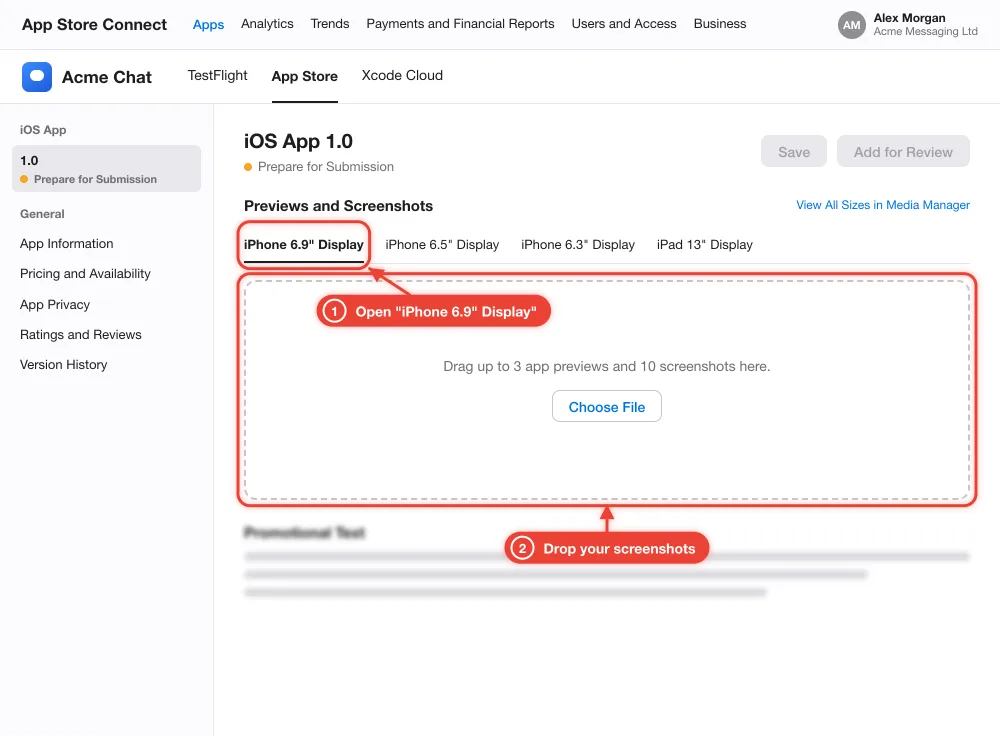
- We make your screenshots with your brand, from your app, and upload them for the iPhone 6.9" and 6.3" displays.
- Prefer your own? Send them to us in the support chat first: iPhone 6.9-inch (1320 × 2868) and 6.3-inch (1206 × 2622) PNG or JPEG.
Your check
- Open your app, then 1.0 Prepare for Submission, and look at Previews and Screenshots. If they look right, tick the step below.
Tips:
- Want a change? Tell us in the support chat before you tick.
Apple's help:
How you know it's done: You tell us here once they look right.
Step 14. Build and upload your app
Who: You and us. Time: Up to an hour: our build, then Apple's processing.
We build your app with your name, icon and links, and upload it to your App Store Connect.
Your click
- When the steps above are done, click Build and upload at the bottom of this page.
What we do
- We build your app and upload it to App Store Connect. Apple processes it and emails you when it is ready.
- You can see it in your app's TestFlight tab. Nothing is public yet.
Tips:
- We are finishing our iPhone build line. If your build waits in the queue, there is nothing to do: it starts on its own, and this page shows it.
- If the build stops, this page says why and what to do.
How you know it's done: Marked done as soon as Apple has processed the build.
Step 15. Send your app to Apple's review
Who: You. Time: 2 minutes, then usually one to two days for Apple's review.
Apple wants the app's owner to send it: that is you. Everything is filled in; it takes four clicks.
Pick the build
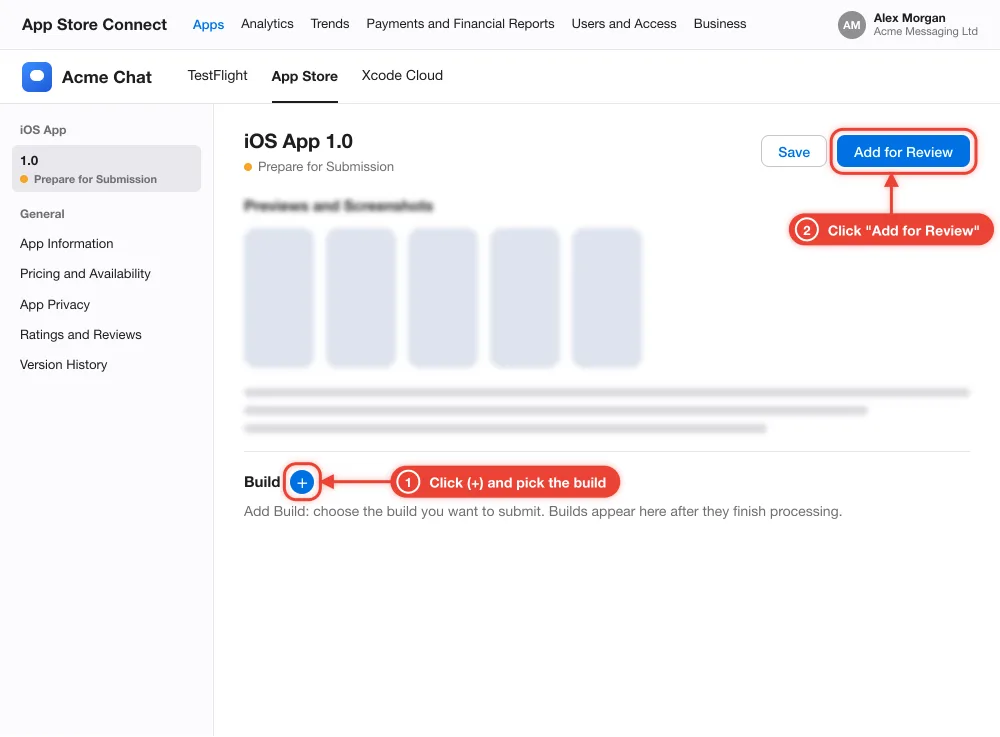
- Open your app, then 1.0 Prepare for Submission.
- In the Build section, click the (+) button, pick the build we uploaded, click Done, then Save.
Send it
- Click Add for Review at the top right.
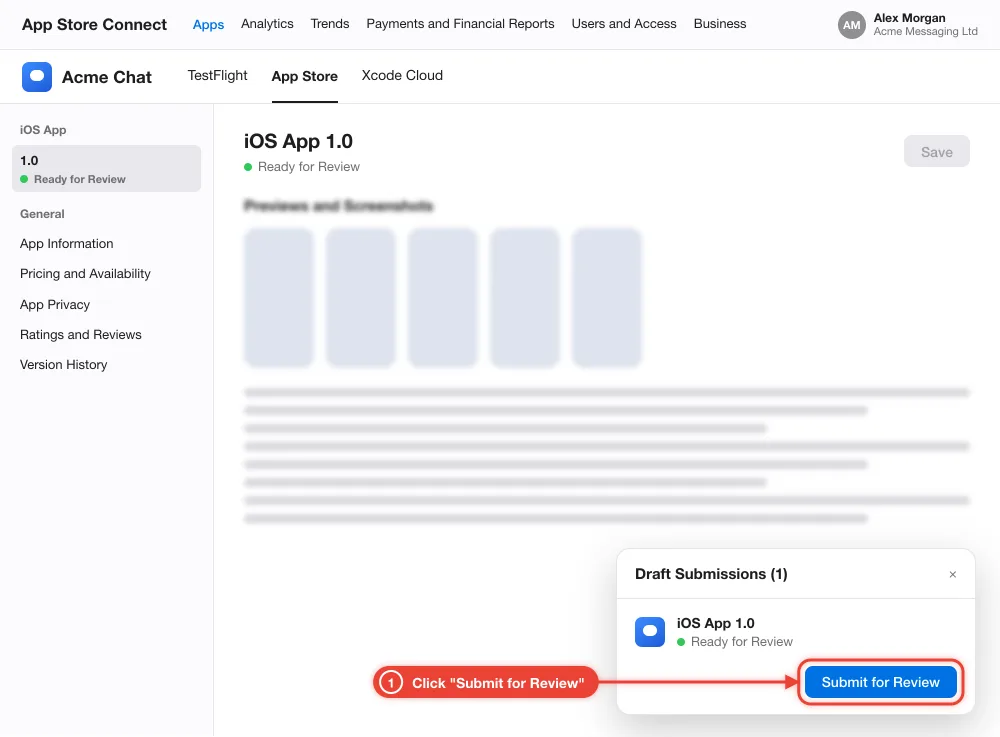
- Open Draft Submissions (bottom right) and click Submit for Review.
After that
- Apple reviews most apps within one to two days and emails you. We show its answer on your iPhone card.
- If Apple asks for changes, we tell you what it said and what to change.
Tips:
- App Store Connect warns about a missing item? It names the step: tell us in the support chat, or do it, then click Add for Review again.
- Your next versions are ours to send: you approve them on your iPhone card.
Apple's help:
How you know it's done: Marked done as soon as we see your app with Apple's review.
After that
You can remove our account from your team at any time in App Store Connect, under Users and Access, and revoke our key under Integrations → App Store Connect API. Then we can no longer update your app.
Apple asks the Account Holder to renew the membership every year and to accept its agreement when it changes. Until then, nobody can update your app.
Stuck on a step? Chat with us from your panel.